
How to Set Up Ubuntu VPS in 2026 (Ubuntu 24.04): Complete Security, Docker, WordPress & SSL Guide
🎟️ Special Cloud Offer: Verified Server Savings
Building a highly resilient Linux environment requires robust baseline hardware. Before configuring your server instance, browse our verified active promotional codes matching top-tier European cloud compute instances.
Provisioning a clean Virtual Private Server (VPS) opens up complete administrative infrastructure flexibility. Whether your roadmap involves executing multi-threaded Python tools, deploying containerized systems, or establishing enterprise WordPress installations, managing the deployment manually ensures that your stack operates without extra panel overhead.
However, an unhardened operating system exposed to public networks is vulnerable to automated malicious scanning scripts. This ultimate pillar guide provides a detailed, step-by-step workflow to safely deploy, optimize, and scale an Ubuntu server instance from initial hardware boot to a production-ready environment.
Table of Contents
- 0. Before You Start: Choosing the Right VPS Hardware
- 1. VPS vs. Shared Hosting vs. Dedicated Server
- 2. Choosing Ubuntu 24.04 LTS
- 3. Ubuntu VPS Initial Architecture Explained
- 4. The Ubuntu VPS Setup Roadmap
- 5. Generating SSH Keys for Authentication
- 6. Initial Login & System Updates
- 7. Linux Server Hardening: Users & SSH Security
- 8. Setting Up UFW Firewall & Fail2Ban
- 9. DNS Binding: Pointing Domains to the VPS
- 10. Kernel Performance Tuning (Swap & BBR)
- 11. Installing Docker CE on Ubuntu VPS
- 12. Installing WordPress via Docker Compose (Production Ready)
- 13. MariaDB Database Performance Optimization
- 14. SSL & HTTPS Configuration via Let’s Encrypt
- 15. VPS Backup Strategy: Snapshot vs. Remote Backup
- 16. VPS Monitoring and Maintenance
- 17. Our Netcup VPS Testing Experience
- 18. Frequently Asked Questions (FAQ)
0. Before You Start: Choosing the Right VPS Hardware
Aligning host hardware allocations with software workloads avoids operational friction. Running intensive full-text search systems or automated indexing engines on undersized instances risks out-of-memory crashes.
| Workload Profiling | Minimum Compute Allocation | Recommended Dedicated RAM |
|---|---|---|
| Static Web / Lightweight VPN | 1 Compute Core | 1 GB |
| Standard WordPress Instance | 2 Compute Cores | 2 GB – 4 GB |
| Multi-Container Docker Environment | 2 – 4 Compute Cores | 4 GB |
| High-Concurrency Database Node | 4 Compute Cores | 8 GB+ |
| Data Scrapers / Heavy Threading | 4+ Compute Cores | 8 GB – 16 GB+ |
1. VPS vs. Shared Hosting vs. Dedicated Server
Picking the correct execution environment dictates your performance limits and security boundaries. Here is why you should set up a VPS instead of relying on legacy hosting models:
| Hosting Category | Performance Output | Administrative Access | Best Suited For |
|---|---|---|---|
| Shared Hosting | Low (Shared noisy neighbors) | Restricted Panel Only | Beginners, Entry Blogs |
| Virtual Private Server (VPS) | High (Isolated Virtual Environments) | Full Root Access | Developers, Systems Admins |
| Dedicated Server | Maximum (Full Bare-Metal Power) | Full Hardware Control | Large Enterprises, Heavy DBs |
2. Choosing Ubuntu 24.04 LTS
When selecting your base operating system image, always choose a Long Term Support (LTS) version. Ubuntu 24.04 LTS is the production baseline for fresh server setups in 2026. This deployment choice utilizes modern Linux kernels, which provide TCP network protocol adjustments and container runtimes out of the box with 5 years of guaranteed security updates.
3. Ubuntu VPS Initial Architecture Explained
Before executing commands, it is helpful to understand how traffic flows through a hardened, containerized server architecture:
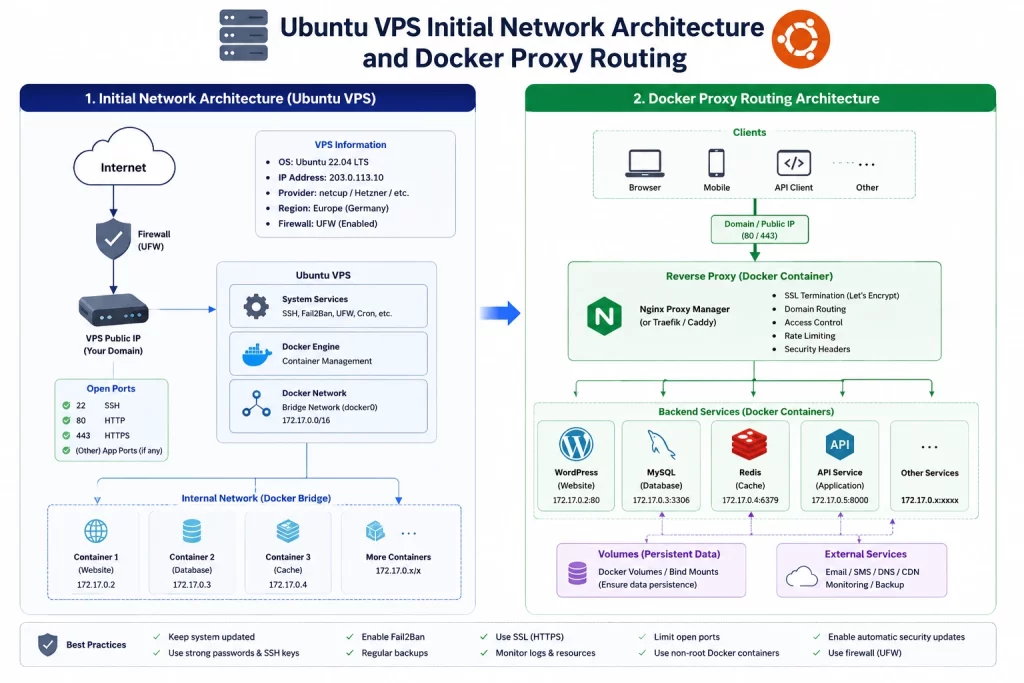
Traffic hits the external network interface, where unauthorized access is dropped by the UFW firewall rules. Valid web traffic passes through an Nginx proxy layer, which securely handles Let’s Encrypt SSL termination before routing requests to isolated backend Docker app environments.
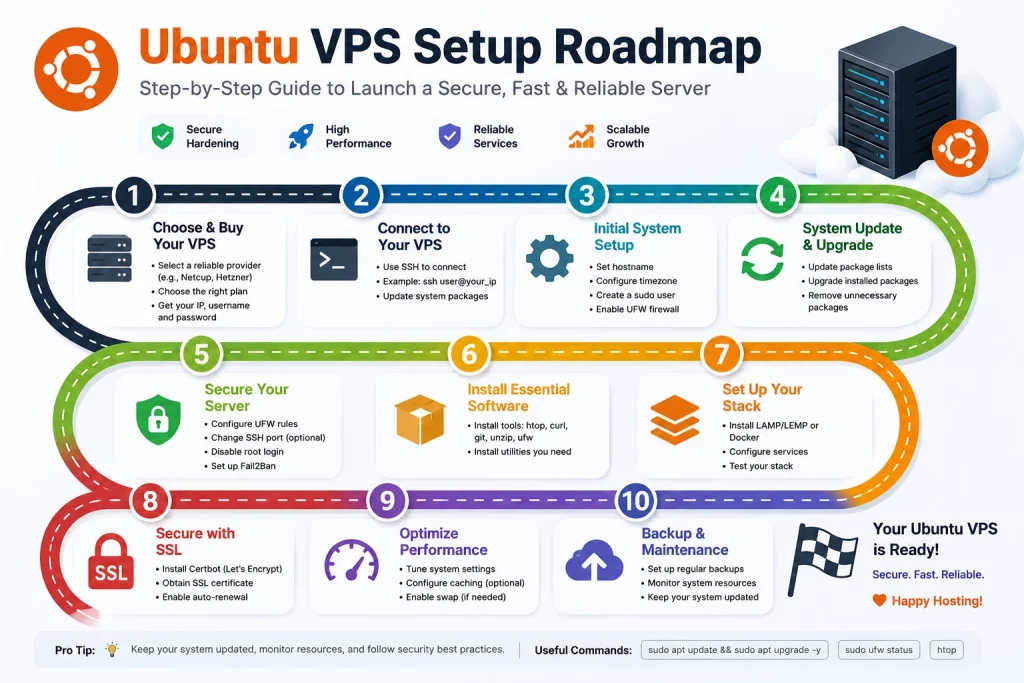
4. The Ubuntu VPS Setup Roadmap
Maintaining security during configuration requires a structured sequence of actions. Follow this roadmap:
5. Generating SSH Keys for Authentication
Asymmetric cryptographic key pairs replace vulnerable passwords with math-based identity verification, protecting your open access port against brute-force intrusion. This must be done on your local computer.
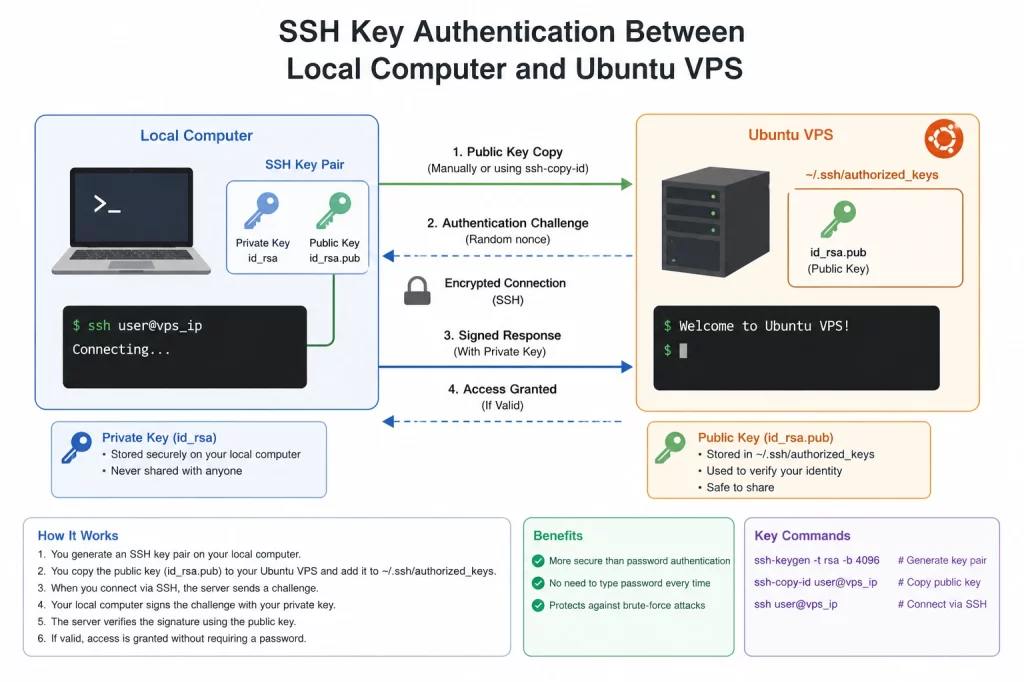
Executing on Linux and macOS Platforms:
Open your local terminal and execute the modern Ed25519 generation sequence:
ssh-keygen -t ed25519 -C "[email protected]"View and copy the generated public block text:
cat ~/.ssh/id_ed25519.pubExecuting on Windows Platforms (PowerShell):
ssh-keygenAccess your user account folder path at C:\Users\YourUsername\.ssh\, locate the public file block (typically named id_ed25519.pub or id_rsa.pub) in a text editor, and copy the full text string.
6. Initial Login & System Updates
Establish the initial root shell session using the public IP information provided by your hosting provider:
ssh root@your_server_ipImmediately sync package lists and pull active security upgrades:
apt update && apt upgrade -yAutomate regular security patching in the background to ensure your server stays secure without manual intervention:
apt install unattended-upgrades -y
dpkg-reconfigure --priority=low unattended-upgrades
7. Linux Server Hardening: Users & SSH Security
Operating a production server directly through the default root profile exposes the entire system to accidental misconfigurations. We will build an administrative account with selective privilege elevation capability.
# Provision the new user profile
adduser sysadmin

# Allocate administrative privilege hooks
usermod -aG sudo sysadmin

# Switch your shell context to the new user account
su - sysadmin

# Configure the local storage paths for the public key block
mkdir ~/.ssh
chmod 700 ~/.ssh
nano ~/.ssh/authorized_keys
Paste your copied public cryptographic string into the file space. Save and close out the file edit buffer.
chmod 600 ~/.ssh/authorized_keysssh sysadmin@your_server_ip. Verify you can access the shell successfully to avoid an accidental lock-out.Enforcing SSH Key Authentication
Once you verify your key-based login functions correctly, open the main configuration file of the SSH service:
sudo nano /etc/ssh/sshd_configLocate the following configuration rules and modify them to match these security settings:
PermitRootLogin no
PasswordAuthentication no
Apply the security changes by restarting the daemon network listener:
sudo systemctl restart sshd8. Setting Up UFW Firewall & Fail2Ban
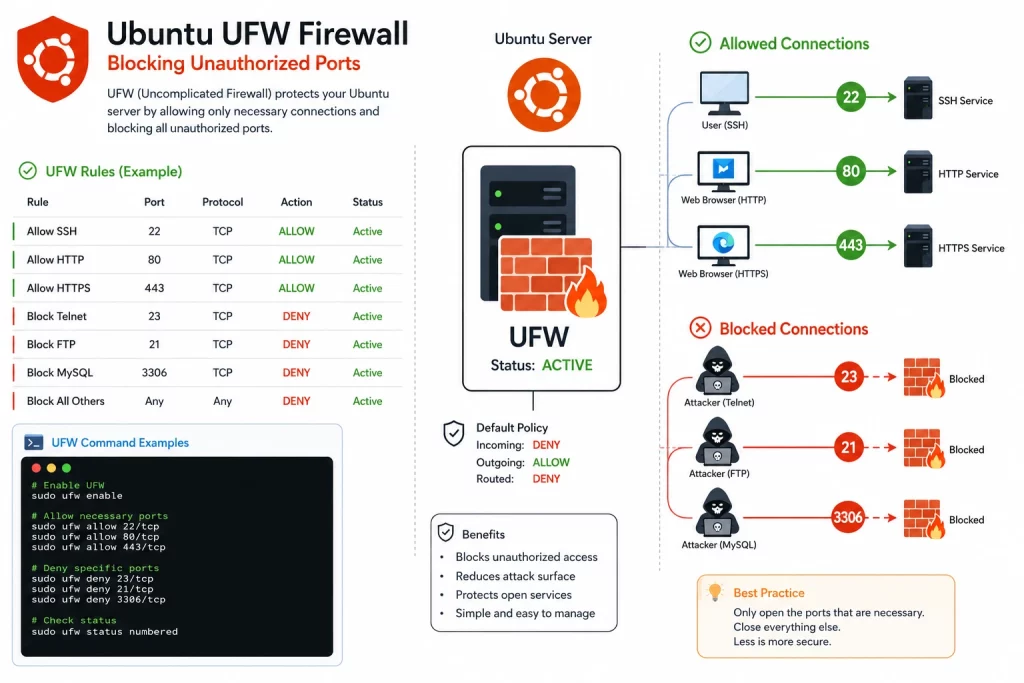
Control network traffic at the edge by turning on the Uncomplicated Firewall (UFW).
sudo ufw default deny incoming
sudo ufw default allow outgoing

# Core web services
sudo ufw allow 22/tcp
sudo ufw allow 80/tcp
sudo ufw allow 443/tcp
sudo ufw enable
Configuring Fail2Ban
Fail2Ban monitors authentication logs and automatically applies firewall bans to IP addresses showing malicious brute-force signatures. Install it and create a custom local jail:
sudo apt install fail2ban -y
sudo nano /etc/fail2ban/jail.local
Add the following production configuration block to protect your SSH port:
[sshd]
enabled = true
port = ssh
maxretry = 5
findtime = 10m
bantime = 1h
Restart the service to apply the new jail rules:
sudo systemctl restart fail2ban9. DNS Binding: Pointing Domains to the VPS
To connect standard web clients to your server applications, map your domain names to your public IP addresses within your authoritative DNS provider interface (e.g., Cloudflare):
- A Record: Core domain pointer (
@) or explicit sub-identity $\rightarrow$Your_Server_IPv4_Address - AAAA Record: Core domain pointer (
@) $\rightarrow$Your_Server_IPv6_Address
10. Kernel Performance Tuning (Swap & BBR)
Allocating System Swap Space
Swap space acts as an automated memory extension, preventing out-of-memory (OOM) kernel loops from killing processes during unexpected workload jumps.
sudo fallocate -l 2G /swapfile
sudo chmod 600 /swapfile
sudo mkswap /swapfile
sudo swapon /swapfile
echo '/swapfile none swap sw 0 0' | sudo tee -a /etc/fstab
Optimizing Network Performance via BBR
Google’s BBR improves TCP congestion control efficiency, especially on high-latency networks.
echo "net.core.default_qdisc=fq" | sudo tee -a /etc/sysctl.conf
echo "net.ipv4.tcp_congestion_control=bbr" | sudo tee -a /etc/sysctl.conf
sudo sysctl -p
Verify that the kernel has accepted the new congestion algorithm parameter and that the module is loaded:
lsmod | grep bbr
sysctl net.ipv4.tcp_available_congestion_control
# Verifying result match includes: reno cubic bbr
11. Installing Docker CE on Ubuntu VPS
Deploying applications inside Docker containers provides dependency isolation, easy migration, and resource boundaries.
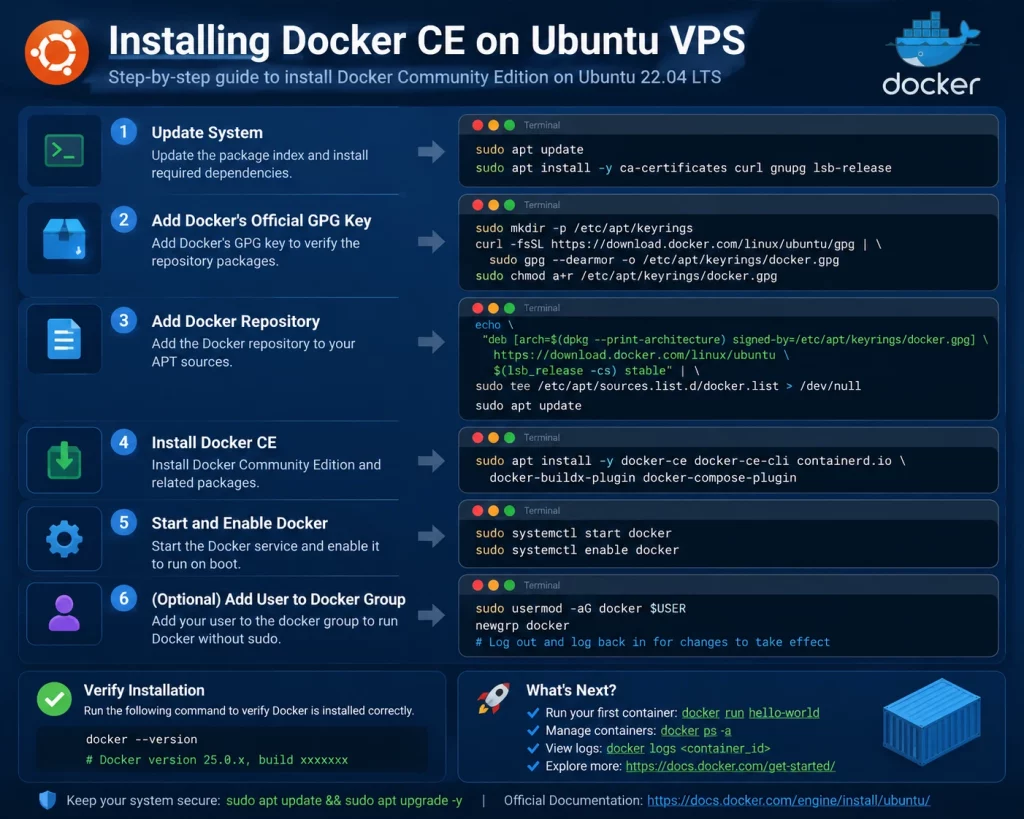
To install the official upstream Docker CE package engine, run the following sequence:
sudo apt-get update
sudo apt-get install ca-certificates curl -y
sudo install -m 0755 -d /etc/apt/keyrings
sudo curl -fsSL https://download.docker.com/linux/ubuntu/gpg -o /etc/apt/keyrings/docker.asc
sudo chmod a+r /etc/apt/keyrings/docker.asc

echo \
  "deb [arch=$(dpkg --print-architecture) signed-by=/etc/apt/keyrings/docker.asc] https://download.docker.com/linux/ubuntu \
  $(. /etc/os-release && echo "$VERSION_CODENAME") stable" | \
  sudo tee /etc/apt/sources.list.d/docker.list > /dev/null

sudo apt-get update
sudo apt-get install docker-ce docker-ce-cli containerd.io docker-buildx-plugin docker-compose-plugin -y
sudo usermod -aG docker $USER12. Installing WordPress via Docker Compose (Production Ready)
Running WordPress bound directly to 8080:80 is fine for testing, but a production environment requires a reverse proxy to route traffic securely based on domain names.
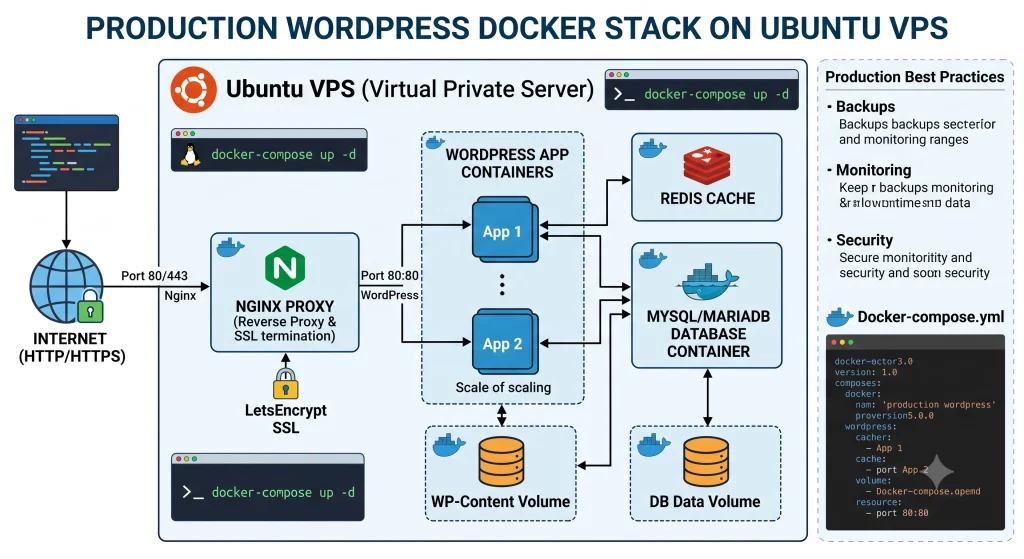
Create an isolated directory /opt/docker/wordpress/ and build this docker-compose.yml. This utilizes an Nginx Proxy block to route domain traffic cleanly to your WordPress container:
version: '3.8'

services:
  nginx-proxy:
    image: nginxproxy/nginx-proxy
    container_name: nginx-proxy
    ports:
      - "80:80"
      - "443:443"
    volumes:
      - /var/run/docker.sock:/tmp/docker.sock:ro
      - certs:/etc/nginx/certs
    restart: always

  database:
    image: mariadb:10.11
    container_name: wordpress_db
    restart: always
    environment:
      MYSQL_ROOT_PASSWORD: secure_root_password
      MYSQL_DATABASE: wordpress_data
      MYSQL_USER: wordpress_user
      MYSQL_PASSWORD: chosen_user_password
    volumes:
      - db_data:/var/lib/mysql

  wordpress:
    image: wordpress:latest
    container_name: wordpress_app
    restart: always
    depends_on:
      - database
    environment:
      VIRTUAL_HOST: yourdomain.com,www.yourdomain.com
      WORDPRESS_DB_HOST: database:3306
      WORDPRESS_DB_USER: wordpress_user
      WORDPRESS_DB_PASSWORD: chosen_user_password
      WORDPRESS_DB_NAME: wordpress_data
    volumes:
      - wp_data:/var/www/html

volumes:
  db_data:
  wp_data:
  certs:
Launch the production web stack in detached background mode by running:
docker compose up -d🚀 Deploying WordPress Frameworks? Select Stable Hosting
Multi-container database applications run best on stable virtualization infrastructure. Review active server configurations and hardware options to keep your applications running smoothly under load.
13. MariaDB Database Performance Optimization
If you are running traditional web stacks (LEMP) directly on the host OS, you must manually adjust MariaDB’s buffer strategies to prevent Out of Memory (OOM) errors.
sudo nano /etc/mysql/mariadb.conf.d/50-server.cnfLocate innodb_buffer_pool_size under the [mysqld] section. Crucially, you must scale this based on your available RAM:
# For a 1GB VPS (Testing):
innodb_buffer_pool_size = 256M

# For a 2GB VPS:
innodb_buffer_pool_size = 512M

# For a 4GB VPS:
innodb_buffer_pool_size = 2G

# For an 8GB VPS (Database Heavy):
innodb_buffer_pool_size = 4G

# For a 16GB VPS:
innodb_buffer_pool_size = 8G
Add the following concurrency optimizations:
max_connections = 100
table_open_cache = 4000
innodb_log_file_size = 512M
innodb_flush_method = O_DIRECT
innodb_flush_log_at_trx_commit = 2
sudo systemctl restart mariadb14. SSL & HTTPS Configuration via Let’s Encrypt
📸 [IMAGE: nginx-reverse-proxy.webp]Alt text: Nginx reverse proxy architecture for SSL termination
Search engines expect standard modern web platforms to use valid transport encryption. You can deploy free, auto-renewing SSL certificates by routing your host web servers through the automated Certbot client:
sudo apt install certbot python3-certbot-nginx -y
sudo certbot --nginx -d yourdomain.com -d www.yourdomain.com
The script will verify your domain records, handle the cryptographic challenge, rewrite your Nginx server blocks to use HTTPS, and configure automatic certificate renewals.
15. VPS Backup Strategy: Snapshot vs. Remote Backup
Never rely on a single system drive partition for permanent data storage. Follow the 3-2-1 Backup Rule: keep 3 copies of your data, on 2 media types, with 1 copy off-site.
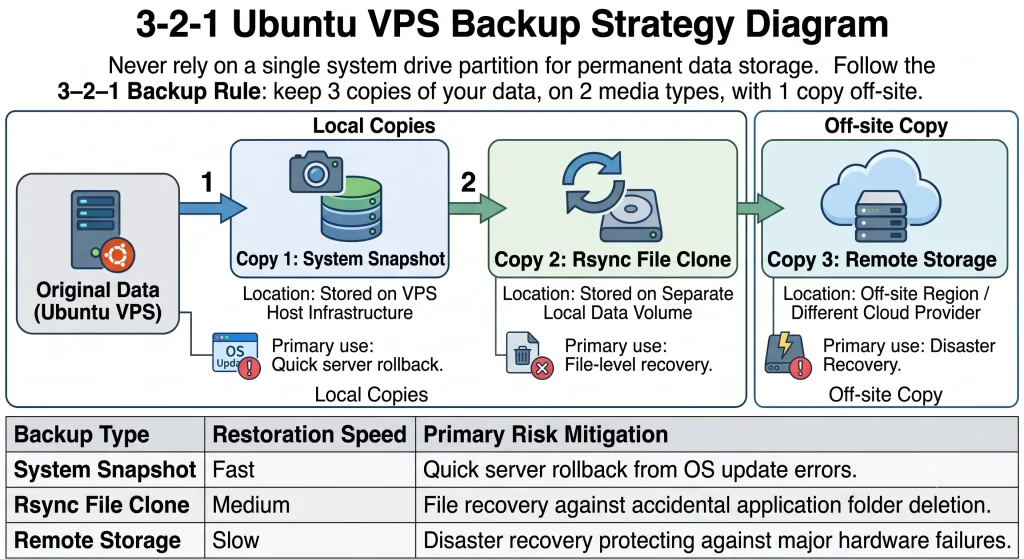
| Backup Type | Restoration Speed | Primary Risk Mitigation |
|---|---|---|
| System Snapshot | Fast | Quick server rollback from OS update errors. |
| Rsync File Clone | Medium | File recovery against accidental application folder deletion. |
| Remote Storage | Slow | Disaster recovery protecting against major hardware failures. |
16. VPS Monitoring and Maintenance
A production server requires continuous observation. Install these essential system administration tools to monitor your VPS health:
sudo apt install htop ncdu iotop -yhtop: An interactive process viewer. Use this to monitor live CPU and RAM consumption.ncdu: A disk usage analyzer. Runncdu /to quickly find which files are consuming your storage.sudo iotop: Monitors disk I/O usage, helping you identify if a specific process is heavily reading/writing to the SSD.journalctl -xe: Inspects systemd logs, crucial for troubleshooting failed service startups.
17. Our Netcup VPS Testing Experience
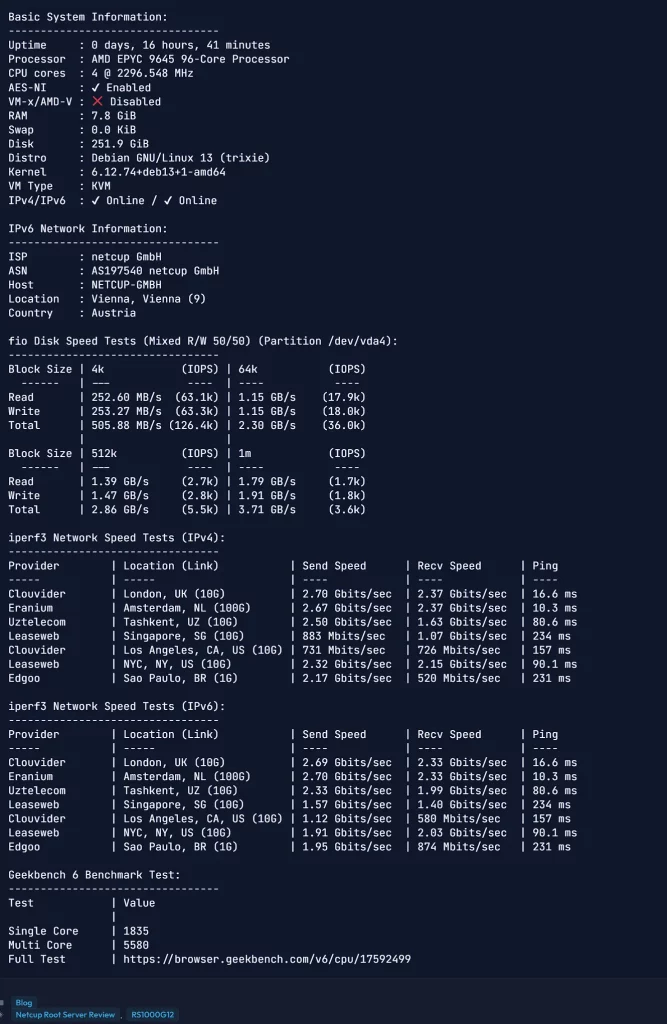
During our testing, Netcup KVM VPS architecture showed exceptionally strong performance for Ubuntu 24.04 workloads including:
- Multi-container Docker environments
- High-traffic WordPress installations
- Optimized MariaDB databases
- Node.js applications and Python automation
- Encrypted VPN servers
The main advantages we observed were the true hardware virtualization (KVM) allowing deep kernel-level tuning (like BBR), dedicated AMD EPYC CPU resource allocation without noisy neighbor throttling, and reliable access to IPv4 infrastructure housed in highly secure German datacenters.
🚀 Launch Your Infrastructure with Netcup
Now that you have a comprehensive guide to deploying a secure, optimized Linux server environment, save on your infrastructure costs. Use our community-verified promotional vouchers on your next server acquisition.
18. Frequently Asked Questions (FAQ)
What is the first thing to do after buying a new Ubuntu VPS?
The critical first step is infrastructure hardening: update your system repository index, provision a dedicated non-root account with sudo privileges, configure SSH key-based authentication, and disable root password entry completely.
Can beginners set up an Ubuntu VPS?
Yes. While it requires interface interaction via the command line, sticking to an organized, step-by-step documentation workflow makes deployment highly manageable. Most virtualization providers allow you to wipe and reinstall a clean OS image instantly if an unrecoverable failure occurs.
Which Ubuntu version should I choose for my VPS?
Ubuntu 24.04 LTS is currently one of the most commonly selected operating systems for new VPS deployments because of its long support cycle and broad software compatibility.
How much RAM does an Ubuntu VPS need?
A basic static website or headless Linux OS can run on 1GB of RAM. However, for hosting a WordPress site, running Docker apps, or managing databases, 2GB to 4GB of RAM is generally recommended.
Is Netcup VPS good for Ubuntu?
Netcup provides KVM-virtualized instances that offer dedicated resource allocation, making it a highly reliable and cost-effective choice for Ubuntu server environments.
Should I use Docker on my VPS?
Using Docker is widely considered a best practice for modern deployments. It separates your services into distinct containers, preventing software conflicts and simplifying web app management.
How do I secure my VPS from brute-force attacks?
The most effective defense is enforcing SSH Key authentication and disabling password entry. Utilizing UFW to shield unneeded ports and configuring Fail2Ban to block recurring malicious login attempts adds further protection.
How often should I update my Ubuntu VPS?
Security patches should be applied as soon as they are available. Deploying the unattended-upgrades utility automates this process, ensuring your server remains secure without manual intervention.
How long does it take to set up an Ubuntu VPS?
A basic Ubuntu VPS setup takes about 15 to 30 minutes. Setting up a production environment with customized firewalls, Docker, Let’s Encrypt SSL, and performance tuning may take one to two hours.
Can I host WordPress on an Ubuntu VPS?
Yes, hosting WordPress on an Ubuntu VPS is highly efficient. You can achieve this by installing a LEMP stack (Linux, Nginx, MySQL/MariaDB, PHP) or by deploying an optimized WordPress Docker container.
How do I install SSL on an Ubuntu VPS?
The easiest way to install an SSL certificate on an Ubuntu VPS is by using Certbot with Let’s Encrypt, which provides free, auto-renewing SSL certificates and configures your web server automatically.
Should I use VPS snapshots or backups?
You should use both. Snapshots are ideal for quick rollbacks before major server upgrades, while remote file backups (via Rsync or off-site storage) protect against catastrophic hardware failure.
Can I install Ubuntu on Netcup Root Server?
Yes, Netcup Root Servers fully support Ubuntu. You can easily select Ubuntu 24.04 LTS or other versions directly from the Netcup Server Control Panel (SCP) during the image installation process.
Is 2GB RAM enough for WordPress VPS?
Yes, 2GB of RAM is generally enough for a standard WordPress site running on a VPS, provided you use an optimized LEMP stack or Docker environment with proper Swap space configured.
Ubuntu VPS vs Debian VPS which is better?
Both are excellent. Debian is often preferred for absolute minimalist stability, while Ubuntu is generally better for newer software packages, extensive community documentation, and modern PPA availability.
How much does Ubuntu VPS cost per month?
An entry-level Ubuntu VPS typically costs between $3 to $5 per month. High-performance KVM instances with dedicated resources from providers like Netcup generally start around €4 to €10 per month depending on the specifications.
What ports should be open on Ubuntu VPS?
For a standard web server, you only need to open Port 22 (SSH), Port 80 (HTTP), and Port 443 (HTTPS). All other incoming ports should be blocked by a firewall like UFW by default.
About the Technical Team
This technical guide was developed by the systems administration desk at netcup.coupons. Our team focuses on network virtualization architecture, core Linux kernel performance tuning, and dynamic application containerization. We test hosting infrastructures, evaluate storage array speeds, and compile open-source documentation to help developers scale web systems efficiently while minimizing infrastructure operational costs.
⚡ Verified Netcup Coupon Codes & Vouchers
Looking for active Netcup discount codes? Redeem real-time checked vouchers below: